
Tuesday 6 November 2012
Australia Map
A good idea for learning geography. Requires some drawing skill, a big table and a small number of kids to start off with. Kids work together to draw native animals and land marks they know about. They also use an atlas to locate and name the capital cities. This activity can be transferred to any country!

Thursday 25 October 2012
Thank You!
My little blog has reached 3000 views! Thank you for all your support. Hope you are having fun!
Monday 22 October 2012
New Book

Introducing my new eBook available for purchase from amazon.com just click on the link. Only US$1.50!
Thursday 18 October 2012
2D Theater
Here is an activity I stumbled across while planing my Drama/Theatre week. It is good for those kids that are creative but don't necessarily want to perform in front of crowds.
Simply print out the cut out here.
The end result is really limited by your imagination. Below is the one I created as an example for my group.


Simply print out the cut out here.
The end result is really limited by your imagination. Below is the one I created as an example for my group.


In case you were wondering here is the story that goes with it:
Once upon time and long ago there was a kingdom. The kingdom was a marvellous place, the whether was good, the soil fertile, the king was kind and the queen was beautiful. Everybody led happy lives. Well, nearly everybody. Not far away enough lived a vicious and blood thirsty dragon. He continually killed the farmer's sheep that lived on the outskirts of the realm.
One day the farmers got together and petitioned the king for action.
"One day all our sheep will be gone, then he will eat us!" yelled one farmer.
"Once he is finished with us he will come after you!" yelled another.
The king knew something needed to be done so he got together all the smartest minds in his kingdom and they had a brainstorming session on what is to be done.
"Maybe we raise an army and kill it?" considered the army general.
"We could try and scare it off." suggested the head jester.
"We should just move, there is no point" lamented the leader of the pessimists society.
"I know what we can do!" chirped a young voice. The whole court turned to face the noise and found a young girl. "My mum is the best cook in the kingdom, her speciality is Satay Tofu. We can try and convince the dragon to eat that instead"
The king, who wasn't a fan of any of the other ideas, decided the young girl's idea was a winner.
They put a large tray of satay tofu out for the dragon. The dragon spotted it and gobbled it all up. "That is quite nice" the dragon belched.
From that day forward the dragon was a vegetarian. The kingdom was saved. The farmers were happy and the little girl's family became quite rich with all the orders of satay tofu ordered and paid for by the king.
THE END
Tuesday 16 October 2012
Stain Glass Windows
A great activity for the start of Spring/Summer with daylight savings providing more light! If you are in the northern hemisphere save this one for six months.
Materials Needed
Materials Needed
- Cellophane - Different colours
- Coloured paper
- Scissors
- Glue
- Markers
Method
- On your piece of coloured paper draw some random shapes. Make sure these shapes are easy to cut out and are spaced evenly apart.
- Cut out your shapes.
- Using the cellophane cover and glue over the cut outs.
- Hang it up on a window that gets plenty of sunshine.
 |
| Front |
 |
| Back |
 |
| Desired Effect |
Tuesday 2 October 2012
Paper Owl
Materials

- Coloured Paper
- Scissors
- Glue
- Circle to trace
Method
- Trace a circle on coloured paper.
- Fold two edges inward to make a sort of shallow 'V' shape, these are the wings-DO NOT GLUE
- Get a different coloured piece of paper and cut to fit under the wing, decorate to show feathers or use glitter.
- Now glue the 'wings' down.
- Using coloured paper add detail such as a beak, eyes and legs.
- One idea is to trace three different sized circles, to make three different sized owls, and make a mobile. This is what I initially wanted to do but I ran out of time.

Thursday 27 September 2012
Toilet Roll Space Ship
Materials


- Aluminium Foil
- Toilet Roll
- Glue
- Paper- Coloured
- Markers/Pencils
- Cardboard from cereal box
Method
- Cut out wing flaps, these will go on the sides of the rocket, from the cereal box card. Also make a cone to go on top from the same material.
- Cut slits on the toilet roll to fit the wing flaps into.
- Cover the wing flaps, the cone cover and the toilet roll in aluminium foil.
- Make sure you cut the aluminum covering the slits in the toilet roll before you insert the wing flaps.
- Decorate with windows and rocket fire.


Friday 31 August 2012
Hiatus
Hi everybody! I just want to let you know that I will be taking a brief hiatus due to a three week European vacation. I will also be working on a book/ebook with all these activities in it. I will post more activities and games as soon as I am able to.
Thanks for your support!
Thanks for your support!
Friday 24 August 2012
Robots!
Materials
- Toilet Rolls
- Aluminium Foil
- Glue
- Markers/Pencils
- Pipe Cleaners
- Coloured Paper
Method
- Cover your toilet roll in aluminium foil. This gives you the basic shape and look for your robot.
- Decide what you want to add. Look below for examples.
 |
| Wheels are made by cutting small sections of the toilet roll, then stuck to the body with sticky tape. |
 |
| Jet Pack Rabbit Robot |
 |
| This child used a mint tin for the body. |
Monday 20 August 2012
Dinosaur Light Catcher
I don't know about you, but I used to love Dinosaurs when I was younger. In fact I still do! Have a go at this colourful activity!


Materials
- Cardboard
- Scissors
- Glue
- Baking Paper (Grease proof paper)
- Tissue Paper (Various colours)
Method
- First you need to find some Dinosaur outlines. A quick Google search will be able to help you with that, like this one.
- Print out which dinosaurs you want.
- Create a template using your cardboard so children can trace the Dinosaur that they want.
- To save some time, cut up three of four colours of tissue paper into small squared and rectangles.
- When you have cut out the Dinosaur, or the kids have depending on their skill level, glue squares of different colours on the back. So that the outline is still clear.
- Put it on a window and enjoy your masterpiece!
 |
| Template Creation |


Friday 17 August 2012
Clock Tower
Creating a mini town? Do your kids like to build cities out of blocks? Have a go at this clock tower to make sure the trains run on time!
Materials
Materials
- Coloured Paper
- Paper Roll (The cardboard tube)
- Glue
- Scissors
- Pencils/Markers
Method
- Pick which colour you want to make your clock tower (I used yellow) and lay an A4 sheet of paper down.
- Glue one end of the paper.
- Roll your cardboard tube along the paper so the glued end sticks and the rest of the paper curls around the tube.
- Glue the end of the paper down.
- Cut out a circle of the same paper and create a cone. Then stick this on the top.
- This is now the basic shape. You can decorate it as you see fit.
 |
| This can be used to teach Roman numerals. |
 |
| You can also use it to talk about time. |
Wednesday 15 August 2012
Spring has sprung!
Spring is almost here in Australia. The pea plants in our veggie patch have started to flower.


Hand Monster or Alien
A good imaginative activity.
Materials

Materials
- Coloured paper
- Markers/Pencils
- Scissors
- Glue
- Large Sheet of paper (White or coloured)
- Hands
Method
- Start off by tracing your hand on to the coloured paper. You will want a variety of colours.
- Then plan your monster. It can be what ever you want it to be! That's what is so good about this activity. Stick it on to your larger piece of paper.
- Add detail with your markers/pencils.

Monday 13 August 2012
Olympic Banner
The end of the Olympics is upon us so we decided to make a banner to do with all the sports Australia did well in, or the sports the kids like.
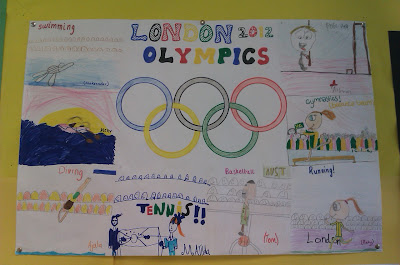


Here is what we came up with:


Tuesday 7 August 2012
Mini Olympics
Why not create your own Olympic stadiums? All you need are boxes, coloured paper, scissors, glue, time and passion!
More hopefully to come!
Here are a couple of our early ones:
 |
| Pole Vaulting |
 |
| Swimming Pool |
More hopefully to come!
Monday 6 August 2012

Olympic Torch
I'm sure you see a lot of Olympic torches out there so I thought I would give you my interpretation.
Materials


Materials
- Cellophane- Red, Orange
- Tissue Paper- Yellow, Red, Orange
- Long Paper Roll
- Aluminium Foil
- Paper
- Markers
- Glue
Method
- Start off by covering the long paper roll in aluminium foil. I found that the easiest way to do this was lying a sheet flat on the table, putting glue on the foil and then rolling the paper roll along the foil so it sticks and then covers the roll.
- Cut off any extra aluminium foil at either end.
- Using a mix off cellophane and tissue paper create a fire at one end.
- Using paper and markers decorate the torch as you see fit.
- To extend this activity you can have groups make different designs then race in a relay race.


Friday 3 August 2012
Pipe Cleaner Alien
Materials

- Different coloured pipe cleaners
- Glue
- Googly eyes
This one is a bit hard to explain in steps. It is simply just twisting pipe cleaners in a way that makes different body parts which can then be glued together to make an alien. It is quite fiddly and I found that the kids were better at making them than I was with my big stupid fingers.

Wednesday 1 August 2012
Snowman and other wintry scenes
Materials Needed


- Cotton Balls
- Glue
- Coloured Paper
- Scissors
Method
- Using the cotton balls make the shape of a snowman. Three circles;biggest on the bottom and smallest on the top.
- Glue these down.
- Using coloured paper cut out some arms, facial features and add detail to the back ground if you wish.
- You can also create other snow scenes with the cotton wool as it can stretch out.


Monday 30 July 2012
Planet Mobile
This activity is a great way to learn about the planets, their colours and their order.
Method


Materials Needed
- Planet printout (Get it here)
- Scissors
- Glue
- String
- Coloured Paper
- Colour pencils
- Two Popsicle sticks
- Glue the two Popsicle sticks together to form an 'X' and put it to the side to dry.
- Colour in all the planets with your pencils, I would suggest to not use markers as it can make it difficult to cut out.
- Cut out the planets.
- When the planets have been cut out trace them on the coloured paper, this will be on the back of the planet, and cut these out.
- Attach a length of string to each spoke of the 'X' you made earlier.
- Attach the planets to the string by gluing the string in between the planet and coloured card cutout.
- You can also cut out the names of the planets and glue on the coloured card as well.
- You can add sequins or colourful cotton balls or just glittery stuff in general to make the whole thing feel a bit more spacey.


Thursday 26 July 2012

Wednesday 25 July 2012
Shooting Stars
This is a good activity to get kids running around.


Materials Needed
- Thick cardboard
- Tissue paper - Lots of different colours.
- Popsicle sticks
- Glue
- Sequins
Method
- Printout a Star and trace it on some cardboard. Make sure you use good scissors to cut out the star or it will be near impossible.
- Using your sequins and whatever you can find lying around decorate the star to be as spacey or glittery as possible.
- Using the tissue paper cut nice long strips of different colours and attach them to the back of the star.
- Attach the Popsicle stick to be used as a handle.
- Tell the kids to run around!


Monday 23 July 2012
Rocket Ship
Here is a picture of a rocket ship we created. All you need is cardboard, paint and tape. Try it yourself!


Friday 20 July 2012
Box Airplane
Great for role play and dress ups. Careful though, as there might be fights over who gets to use it.
Materials Needed:


Materials Needed:
- Cardboard Box
- More cardboard for wings
- Paint
- String
- Tape
When you have finished designing and decorating your plane and it has dried cut some string and attach it to the plane so that kids wear the plane like overalls.


Thursday 19 July 2012
Relay Games
Relay games can be a lot of fun and you can make them as interesting as you want. Making the 'baton' can be an activity in itself.
Below are two examples.
Suit Case Relay
What you need:
We did this relay in conjunction with an Olympic Games theme day.


Below are two examples.
Suit Case Relay
What you need:
- Cardboard
- Tissue/Crepe Paper- Brown
- Glue
- Scissors
We did this relay in conjunction with an Olympic Games theme day.
- We got some old cardboard boxes, sketched and cut out some suitcases with easy hold handles.
- Cutting out some tissue/crepe paper we glue it all over the suitcases.
- We stuck some travel stamps and stickers we found on the internet over it to give it some authenticity. Have a look here.
- Most of our suitcases didn't last the race as some of the competitors were quite 'passionate'.


Rocket Relay
What you need:
- Different coloured paper
- Cello tape
- Scissors
We did this relay on a space theme day.
- Roll some paper into a cylinder and stick it together.
- Cut out a small circle and create a cone, this is for the top of the rocket.
- Cut out some triangles for flaps on the side of the rocket.
- To make this one a bit more interesting I put a hula hoop 'planet' at the end and the runners needed to orbit the planet three times before going back to home base.


Tuesday 17 July 2012

Subscribe to:
Posts (Atom)